Luxurious Bathrooms with Stunning Design Details

When I was in college one of my favorite rooms to design was Master Bathrooms with unique interesting set up. When I design my own home, my personal bathroom will be unbelievable. In the meantime, take a look at some beautiful bathroom designs at the line below.


Luxurious Bathrooms With Stunning Design Details

While we may not think of the bathroom as an important part of a home’s overall design, when you have a luxurious, perfectly appointed bathroom, people are going to notice…and you may not be able to get them to leave! The designs in this post come to use from interior designer Ahmed Mady and though each room is distinct, they all carry an essence of ultimate luxury. Go ahead, dip your toe in.  (More..)

Photo: Luxurious Bathrooms With Stunning Design Details - http://www.home-designing.com/2014/09/luxurious-bathrooms-with-stunning-design-details

~Laverne

Can I get a “YES!”

With my new job, I offer free in-home consultations, measure and install service for window treatments with thousands of pattern and color choices to create a custom look for someone’s home.

When I first started, I thought it was going to be easy to get people to buy. Well, let me tell you that it is challenging. (However, I love challenges no matter how difficult.) My first 2-3 weeks starting out, I did not get anyone to buy anything. I think mostly because people do not realize how much custom draperies cost. A pair draperies can start off at relatively $1500 and that’s just a plain simple solid without any kind of detail.  Trust me, most of my clients are not looking for simple by any means. Don’t get me wrong though, simple definitely can have a statement depending on how you execute the design and what else is going on the room. Most of my clients want their draperies to be one of their focal points.

Before, I received my first “yes,” I was literally almost at my breaking point. I was so frustrated and felt defeated because I kept constantly hearing no over and over again. The look on a clients’ faces when I quoted out the cost took me a while to get used to. They would literally be in a moment of shock. At that point, it is on me to convince the customer that what they selected is worth the money they are going to spend and that it is going to look wonderful. You need to give them that “reassurance.”

So, you can believe I was excited to finally hear a “YES!” It is going to be beautiful and the client is going to absolutely love it. If this first part of the project goes well, she is going to do several more rooms in her home. Within the same week, I got another “YES!” and now the project is underway and they plan on doing several more rooms as well. I can’t wait to see the window treatments up in the rooms. I will be sharing pictures with you all.

My main point in sharing all this is that being in a sales position where you have to go to people’s home is hard. You are on the customer’s turf playing by what sometimes seems like their rules. The key is to allow the customer to think that they are making all the decisions when you really are. You guiding them to the solution they want. Someone told me that in the beginning you will hear more no then yes; however, when you get your first yes, they are going to start coming more frequently and your clientele is going to start growing. It is a hurdle. I believe hearing that helped me to keep going and overcome that feeling of defeat.

Wish me luck as I continue on with the many challenges that my job will give me. It definitely keeps it fun and interesting.

~Laverne

What Have I Been Up To?

Wow! It has been so long since I have posted anything. So here is what I have been up to?

I have been working on trying to further my career and utilize my Interior Design Degree. Currently, I am working as an In-Home Custom Decorator. I assist customers in creating the perfect window treatment for their home including matching accessories. I really enjoy my job and let’s not even talk about homes I go into. Sometimes I feel a tad bit intimidated. I have only been doing this for 3 weeks and it gets better and better. I will gladly share projects that I am working on with you all and feel free to give your opinion.

I have not been painting as of lately because I simply just do not have the time anymore. My new job definitely has given me new appreciation for time management. Once I get really settled into my job, I would love to go back and continue painting to get my Etsy shop, Cre8ive Obsessions, back up and running. I have few ideas that I need to just finish. So be prepared for that and like always feel free to suggest any design that you want to see or request an item for you and/or your family and friends. I will make time for any commission request.

One last final thing, I have been working on a few DIY projects. I can not wait to finish them and share them. This time I will not make them into crazy long post. I went back looking at the Jewelry Box and wondered what I was thinking. I should have broken it up into parts.

That was  quick update as to what is going with me and things to come. So what have you been up to?

~Laverne

Options

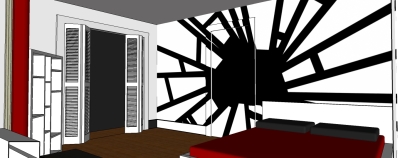
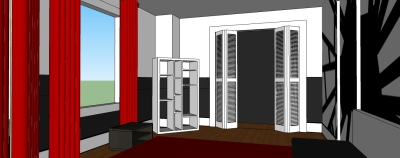
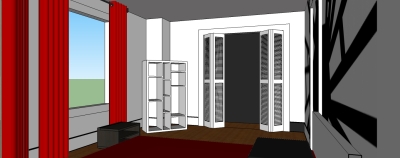
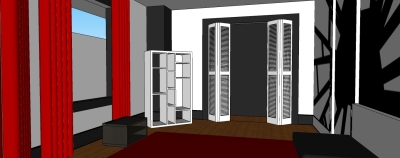
So I told you guys that I was helping my friend design his new apartment. Here are some of the options I sent him. Remember the theme for his bedroom is “murder.” The mural is the main focus of the design. Let me know what you all think.

Jerome Apartment 4


Option 1

Jerome Apartment 5


Option 2

Jerome Apartment 3


Option 3

Jerome Apartment 1

~Laverne


I Love Interior Design!

I have a friend who just recently moved into a two-family flat. He has about 8 or so rooms that he wants to design. And guess who he asked to help him…….this girl right here. I am so excited. Every room has a different theme with totally different feels and colors but they all need to connect slightly. Connecting the rooms will be the hardest part. Luckily for him, I am ready for any challenge. We already have some great ideas going. I will keep updated as we get further into the project.

~Laverne

Creative and Unique

So I know I said I would have those boxes posted on certain days, but I have been very sick with a cold. I barely go to work. I am one of those people who when they are sick it’s all bad. I am working really hard to get things done so they can get listed on Etsy, so please just bear with me. I have listed the Blood Lad Coffin, so go check it out.

1234234_441650952611564_520059881_n

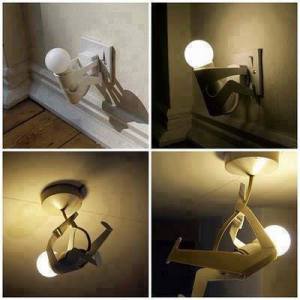
Well in the meantime, I came across this little cool looking light. It is made by a company called Doulex. I really like how fun this light is. The little guy pulling the plug definitely mad me laugh and feel a little bit better.  It would definitely be perfect for any kid’s room. Unfortunately, I had a hard time finding where to buy it. Although, I do not have any children I would not mind having it.

~Laverne

DIY Jewelry Organizer

Before, I mentioned coming up with my own jewelry organizer……and so…..I HAVE!!! I have gathered a variety of ideas from projects other people have posted and found what I liked and combined different ideas to create one perfect for me.

So let’s get started….

There are two parts.
2013-08-02 11.02.03

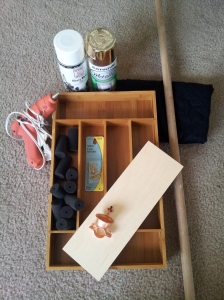
Supplies (Part 1):

Cutlery Tray

Wooden Dowel

Black and Gold Spray Paint

Cup Hooks

Fabric

Hair Rollers

Sand Paper

Bell Hanger

Plywood Sheet

Hot Glue Gun

Hacksaw

A few of the items I already had, so the price was not a concern for me. If you want to keep it on the less expensive side see what you already have, what you can use to improvise, and go shopping in family and friends’ garage.

PART 1

Step 1

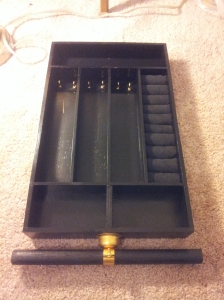
I measured out a piece of the plywood to fit right in the center of the bottom horizontal opening for a divider. Then, I cut it out with the hacksaw and secured it in place with the hot glue gun. (This piece is important for the bell hanger considering how long the screw for it is. If you will not be using the bell hanger, then it is not necessary.)

Next, I measured out the wooden dowel to be no longer than the width of the tray, cut off the access and sanded both ends.

Step 2

My color scheme is black and gold. Therefore, I spray painted the bell hanger gold; and the cutlery tray, wooden dowel and plastic canvas black.

Step 3

While those items are drying, I started on the ring holder.

First, remove the plastic rod pieces from the foam rollers. Then cut pieces of fabric the same length as the rollers and large enough to go around the rollers with enough for just a bit of overlapping.  Run a line of hot glue along the edge of the fabric lengthwise. Carefully glue the roller piece down.  Roll the fabric around the roller and add another line of glue to the edge, securing the roller.  The roller should be covered except for the ends.

(Now, make sure your cutlery tray is dry and that it does not need  second coat of paint before continuing rest of the step. It’s also a good time to check and see if any of  your other supplies need another coat as well.)

Run a line of glue over the section of roller that has the fabric  edge (underside) and press into your chosen section of the cutlery tray, making sure it is snug against top edge of tray.  Repeat with remaining roller pieces, making sure to space pieces evenly and making sure they are snug. If there are any pieces of fabric bunched up, just take something thin and push the edges of the fabric down.

Step 4

Now its time to screw in the cup hooks into the remaining slots. (Note: You can also use eyelets or more cup hooks if you chose as well. It’s at the discretion and needs for you jewelry.) I wish I had a drill when I first started but believe by the end I borrowed a friends. If you have a drill, get a hole started for you so it can be easier to screw in the hooks. If not, well join the party in the hard way.

What I had to do was  use a bigger screw to start each hole and use some downward force to screw in the hooks. At a certain point my I could not twist anymore and my hands were too  big for the space so I used needle nose pliers. Just be careful not to bend the hook part. (I almost snapped a hook off one.)

Step 5

I then screwed in the bell hanger into the bottom center piece we added earlier. (I had to end up using a shorter screw because without a drill I could not get the screw to go all the way through.) Then put the wooded dowel through the center and screwed it the bell hanger closed.

Step 6

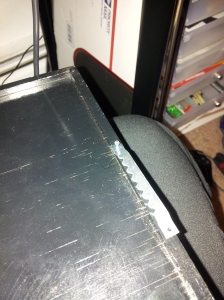
Nail in the saw tooth picture hanger in back. (Or you can screw it directly into the wall right through the center of the top compartment. My wall did not allow me do to so.) IF YOU ARE DOING PART 2  DO NOT ATTACH TO WALL YET.
2013-09-06 20.02.33

PART 1: FINISHED

2013-08-28 21.37.53

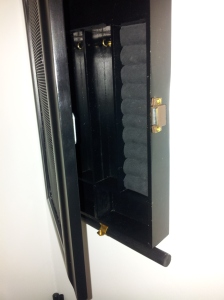
NOW FROM HERE IF YOU CHOOSE TO YOU CAN STOP AND BE DONE WITH THE JEWELRY BOX, BUT I AM REALLY EXTRA SO i ADDED A LITTLE SOMETHING EXTRA. I WANTED IT TO BE MORE LIKE A CABINET SO I ADDED A DOOR. SO HERE IS PART 2!

Supplies (Part 2):

Picture Frame

Plastic Canvas

Hinges

Hot Glue Gun

Variety of Screws

Drill

Step 1

I took a picture frame and some plastic canvas to make an earring holder.

First, I cut the plastic canvas to fit the back of the frame. Then used the hot glue gun to secure it to the back of the frame. I used a lot of glue as you can tell from the picture. I wanted to make sure it was secure.

Step 2

Before beginning this step I suggest you temporarily remove the wood dowel because it may get in the way. ( I know it got in my way at times.) Also by this time, I borrowed a friend’s drill because you really need pilot holes. It makes life a 100 times easier.

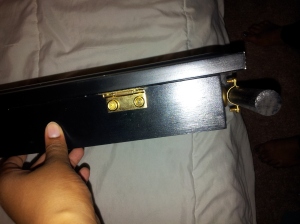
Next, I attached two hinges to the cutlery board and then our newly made earring holder. This will act as a cabinet door to the tray. (Note: Pay attention to how long your screws are so that they do not go all the way the through to the wood. )
2013-09-09 23.01.11

Step 3

Attach a magnet on the opening side to secure it close for when not in use.
2013-09-09 23.00.12

YAY! WERE DONE!

I still have too much jewelry that I have to build another one, maybe two. Feel free to ask any questions and leave any feedback. Thanks.

~Laverne

Blank Canvas

I am getting ready to move to a new apartment. I am so excited although we have not decided on a place yet. I want to really want to add a little bit of design to it. I have so many ideas that I want to try to execute.

It is going to be terrible though because my boyfriend and I are going to live with a roommate again. So, I do not know how much designing I will be able to get away with and whether they will be able to take care of things. I live with this person now and we bump heads quite a bit and his logic is something else. I am sure I can survive one more year with him, besides the logic thing he can be cool.

Anyways, back to the designing aspect. There are previous ideas that I have supplies for that I have yet to execute and new ones as well. Here are a few of my upcoming projects that I want to do and are very easy. 


I simply can’t wait to get these going. I will show you what I have done step by step. I always try to take an idea and see how i can do it differently or better. 

~Laverne W.
Jewelry Organizers

I have quite a bit of jewelry and my collection is not going to be getting smaller anytime soon. Therefore, I have been trying to find a better way to display my jewelry in a visually organized way.

I have tried different kinds of jewelry holders  and have always found a problem with each one:

80-Pocket Hanging Jewelry Organizer

For example, the one organizer to left  (similar to one I have) can be easily stored in your closet. It has several vinyl pockets for you to place you jewelry in. Mine came with labels on the front of each pocket for earrings, necklaces, bracelets, etc… It is also two-sided.

Believe me it worked great at first but then the more jewelry I got the more of a hassle it became. At one point, I could place each piece of jewelry in each compartment, but not anymore.

Now i am back to my jewelry getting all tangled up. I also have very wide bangles that can not fit inside the bigger pockets. My closet is full of clothes as well so it makes it hard to make space to access either side. I tried hanging it on the wall as well but I got tired of always having to pick it up turning it around. (That probably sounded lazy but when it was in the closet with less clothes i could twist it around.)

I have something similar to this for my earrings because I always manage to lose my studs. It works great for that, but not my dangling earrings. I have some that are very long a stiff and do not work well in the holder above.

I have also had jewelry cases but I do not really care for placing my jewelry in drawers and they do not accommodate really over the top jewelry.
So, now I end up with jewelry placed on whatever surface I end up taking them off at. I end running around looking all over the whole room for where I placed things (thinking I lost it because I can not recall). My boyfriend gets so mad because sometimes it ends up on his desk or when we are trying to leave and I am running around trying to find stuff. I hate being unorganized. It really stresses me out.
Here’s my solution.
I looked up a few DIY projects and there were many that could work for me but there was always something essential missing whether it was a place for stud earrings, rings, or bangles.
So I found a few I like and will be taking aspects from them that I like to create my very own organizer. Once I have all my supplies I will show the process of putting it together.
I am so excited.
~Laverne